Speed Limit Alert: Build Your RPM Speed Detector!
Wireless portable unit
Adaptable with most internal combustion engine vehicles
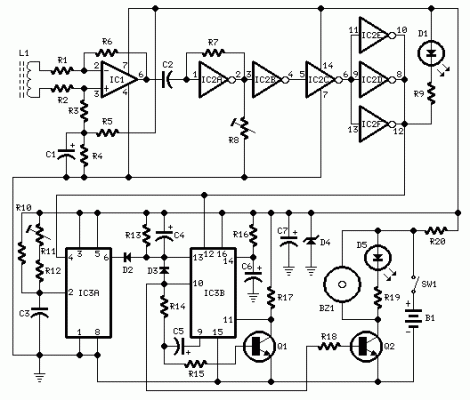
Circuit diagram
Parts:
- R1, R2, R19 1k 1/4W Resistors
- R3-R6, R13, R17 100k 1/4W Resistors
- R7, R15 1m 1/4W Resistors
- R8 50k 1/2W Trimmer Cermet
- R9 470Ω 1/4W Resistor
- R10 470k 1/4W Resistor
- R11 100k 1/2W Trimmer Cermet (see notes)
- R12 220k 1/4W Resistor (see notes)
- R14, R16 68k 1/4W Resistors
- R18 22k 1/4W Resistor
- R20 150Ω 1/4W Resistor (see notes)
- C1, C7 100µF 25V Electrolytic Capacitors
- C2, C3 330nF 63V Polyester Capacitors
- C4-C6 4.7µF 25V Electrolytic Capacitors
- D1, D5 Red LEDs 3 or 5mm.
- D2, D3 1N4148 75V 150mA Diodes
- D4 BZX79C7V5 7.5V 500mW Zener Diode
- IC1 CA3140 or TL061 Operational Amplifier IC
- IC2 4069 Hex Inverter IC
- IC3 4098 or 4528 Dual Monostable Multivibrator IC
- Q1, Q2 BC238 25V 100mA NPN Transistors
- L1 10mH miniature Inductor (see notes)
- BZ1 Piezo sounder (incorporating 3kHz oscillator)
- SW1 SPST Slider Switch
- B1 9V PP3 Battery (see notes)
- Clip for PP3 Battery
Device purpose:
This circuit has been designed to alert the vehicle driver that they have reached the maximum fixed speed limit (i.e., on a motorway). It eliminates the need to look at the tachometer and to be distracted from driving. There is a strict relationship between engine's RPM and vehicle speed, and this device controls RPM, starting to beep and flash an LED once per second, when the maximum fixed speed is reached. Its distinctive feature is that no connection is required from the circuit to the engine.
Circuit operation:
IC1 forms a differential amplifier for the electromagnetic pulses generated by the engine sparking plugs, which are picked up by sensor coil L1. IC2 then further amplifies the pulses, and IC2B to IC2F provide an inverter, generating a clean pulse square wave. The monostable multivibrator IC3A is used as a frequency discriminator, with its pin 6 going firmly high when the speed limit (set by R11) is reached. IC3B, the transistors and associated components, provide timings for the signalling part, formed by LED D5 and piezo sounder BZ1. D3 introduces a small amount of hysteresis.
Notes:
- D1 is necessary at setup to monitor the sparking plugs emission, thus permitting easy finding of the best placement for the device on the dashboard or close to it. After the setup is completed, D1 & R9 can be omitted or switched-off, saving battery power.
- During the preceding operation R8 must be adjusted for optimal results. The best setting of this trimmer is usually obtained when its value lies between 10 and 20k.
- You should perform this initial setup when the engine is on but the vehicle is stationary.
- The final simplest setting can be made with the assistance of a second person. Drive the vehicle and reach the desired speed. The helper must adjust the trimmer R11 until the device operates the beeper and D5. Reducing the vehicle’s speed the beeping must stop.
- L1 can be a 10mH small inductor, typically sold in the form of a tiny rectangular plastic box. If you require increased sensitivity, you can construct a special coil, winding 130 to 150 turns of 0.2mm enameled wire on a 5cm diameter former (e.g., a can). Extract the coil from the former and secure it with insulating tape creating thus a stand-alone coil.
- The circuit’s current consumption is approximately 10mA. If you intend to utilize the car’s 12V battery, you can connect the device to the lighter socket. In this case, R20 must be 330Ω.
- Depending on the engine’s cylinders number, R11 may be unable to set the device properly. In some situations, you must use R11=200k and R12=100k or less.
- If you need to set up the device on the bench, a sine or square wave variable generator is required.
- To calculate the frequency relation to RPM in a four-stroke engine, you can use the following formula: Hz = (Number of cylinders * RPM) / 120. For a two-stroke engine, the formula is: Hz = (Number of cylinders * RPM) / 60. Thus, for a car with a four-stroke engine and four cylinders, the resulting frequency at 3000 RPM is 100Hz.
- Temporarily disconnect C2 from IC1’s pin 6. Connect the generator’s output to C2 and Ground. Set the generator’s frequency to i.e. 100Hz and regulate R11 until you hear the beeps and LED D5 flashes. Reducing the frequency to 99 or 98 Hz, the beeping and flashing must stop.
- This circuit is not suitable for Diesel engines.
circuit from http://www.redcircuits.com/
