- Clap-Activated Relay Circuit: Diagram & Build Guide
- Room Noise Detector Circuit: Build Your dB Threshold!
- Build Your Own 1.8KHz Whistle Responder Circuit
- Whistle Responder Circuit: Build Your Own Beeping Gadget
- Voice Activated Switch: Mastering R6 for Superior VOX Control
- Build Your Key Finder: A 3-4kHz Circuit
- Room Noise Detector: Build Your dB Threshold Circuit
- Sound-Activated Relay Circuit: Build Your Responsive Project
- Whistle Circuit: Build a Toggle Flip-Flop with Filters
Build Your Own 1.8KHz Whistle Responder Circuit
Description
Approximately twenty years ago, it was a common sight to observe small key-holders producing a brief, sporadic beep following a person's whistling. These devices relied on a specialized integrated circuit and therefore were unsuitable for DIY construction projects. The present circuit is designed around a general-purpose hex-inverter CMOS IC and, utilizing miniature components and button clock-type batteries, can be enclosed within a matchbox. It is primarily a novelty item, but anyone can likely discover suitable applications for it.
4049 Hex Inverter IC
The 4049 is a versatile CMOS inverter IC that provides six independent inverting input stages. Its low power consumption and high input impedance make it well-suited for a wide range of digital logic circuits. This particular IC is frequently utilized in educational and hobbyist projects due to its simplicity and readily available documentation. The IC operates reliably over a voltage range of 2.6 to 3.6V, offering flexibility in power supply options.
Circuit operation:
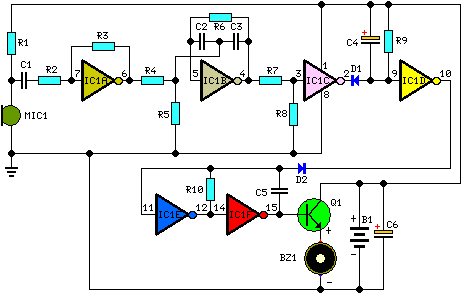
This device emits a beep intermittently for approximately two seconds when an individual within a radius of around 10 meters produces a whistle. The initial two inverters contained within IC1 are employed as audio amplifiers. IC1A consistently amplifies the signal captured by the small electret microphone, and IC1B functions as a band-pass filter, its center frequency centered around 1.8KHz. This filter is necessary to select a specific frequency, that of the whistle, while suppressing other frequencies that could trigger unintended beeping operation. IC1C is configured as a Schmitt trigger, squaring the incoming audio signal. IC1D serves as a 2-second-delay monostable, driving the astable formed by IC1E & IC1F. This oscillator generates a 3 to 5Hz square wave, which is fed to Q1 and BZ1, thereby providing intermittent beeper operation.
Circuit diagram:
Parts:
- R1 = 22K 1/4W Resistor
- R2 = 10K 1/4W Resistor
- R3 = 4M7 1/4W Resistor
- R4 = 100K 1/4W Resistor
- R5 = 220R 1/4W Resistor
- R6 = 330K 1/4W Resistor
- R7 = 47K 1/4W Resistor
- R8 = 100K 1/4W Resistor
- R9 = 2M2 1/4W Resistor
- R10 = 1M5 1/4W Resistor
- C1 = 47nF 63V Polyester or Ceramic Capacitors
- C2 = 10nF 63V Polyester Capacitors
- C3 = 10nF 63V Polyester Capacitors
- C4 = 1µF 63V Electrolytic Capacitors
- C5 = 47nF 63V Polyester or Ceramic Capacitors
- D1 = 1N4148 75V 150mA Diodes
- D2 = 1N4148 75V 150mA Diodes
- Q1 = BC337 45V 800mA NPN Transistor
- B1 = 2.8 or 3V Battery (see notes)
- IC1 = 4049 Hex Inverter IC
- BZ1 = Piezo sounder (incorporating 3KHz oscillator)
- MIC1 = Miniature electret microphone
Notes:
- Power supply range: 2.6 to 3.6 Volts.
- Standing current: 150µA.
- Depending on the dimensions of your enclosure, you can select from a wide variety of battery types:
- 2 x 1.5 V batteries type: AA, AAA, AAAA, button clock-type, photo-camera type & others.
- 2 x 1.4 V mercury batteries, button clock-type.
- 1 x 3 V or 1 x 3.6 V Lithium cells.
