- CMOS Toggle Flip Flop: Laser Pointer Circuit Diagram
- CMOS Flip Flop Toggle Relay Circuit Diagram 4013
- MOSFET Relay Circuit: Build Your 6V Toggle System
- Build Your 12V Single Transistor Relay Circuit
- Relay Toggle Circuit: 556 Timer Delay Design
- 555 Timer Relay Toggle Circuit Diagram 100uF Capacitor
- Build a Robust MOSFET Toggle Switch Circuit – 12V, IRFZ44
- Build Your 8-Source Electronic Selector Circuit Diagram
- Build Your Own Toggle Relay Circuit – 5 to 15V Power
- Dual Relay Driver: Boost Sensitivity with BC547 Circuit
- 230V AC Toggle Switch Circuit: Build Your Own!
230V AC Toggle Switch Circuit: Build Your Own!
Description
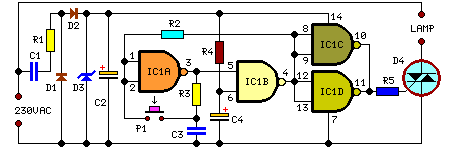
Owing to its minimal current consumption, this circuit can be powered directly from a 230Vac electrical network without the need for a transformer. The incoming voltage is reduced to 12Vdc utilizing the reactance of C1, a diode bridge comprised of diodes D1 and D2, and a Zener diode D3. IC1A, IC1B, R2, R3, and C3 collectively create a dependable, non-oscillating toggle switch operated by P1. R4 and C4, connected to pin #6 of IC1B, reset the circuit (turning the lamp off) upon application of power. IC1C and IC1D, connected in parallel, function as a buffer, driving the Gate of the Triac through R5.
Integrated Circuit Description
IC1 is a 4011 NAND Gate, a versatile digital logic component commonly employed for creating various digital circuits. The NAND gate's primary function is to produce an output that is logically inverse to the inputs. This makes it useful for creating logic gates, flip-flops, and other digital circuits. The 4011 series is well-suited for low-power applications due to its efficiency and compact size.
Circuit diagram:
Parts:
- R1 = 470R
- R2 = 10K
- R3 = 100K
- R4 = 100K
- R5 = 1K
- C1 = 330nF-400V
- C2 = 100uF-25V
- C3 = 100nF-63V
- C4 = 10uF-25V
- D1 = 1N4007
- D2 = 1N4007
- D3 = BZX79C12
- D4 = TIC206M
- IC1 = 4011 NAND Gate
Notes:
- The circuit can be permanently connected to the mains supply as the current draw is negligible.
- Due to the transformerless design, there is no heat generation.
- Low Gate-current Triacs are recommended for optimal performance.
- It is obvious that other appliances can be powered in place of a lamp, provided their power dissipation does not exceed approximately 400W @ 230V.
- Operation at 110-120Vac is easily achieved by simply altering the value of C1 to 680nF 250V. No further adjustments are required.
- In certain scenarios, such as when the controlled device is located far from the toggle switch, a pilot LED may be necessary for monitoring purposes. If so, disconnect pin #10 of IC1C from pin #11 of IC1D and wire a LED and its 1K series current limiting resistor across pin #10 of IC1C and the negative supply.
- Warning! The circuit is connected to 230Vac mains, so certain components on the circuit board are subject to a lethal electrical potential! Avoid contact with the circuit while it is plugged in, and enclose it within a plastic enclosure.
- P1 will be a SPST Pushbutton
