- Simple 4 Transistor Hearing Aid Circuit Diagram
- Amplified Ear: Build a Sensitive Sound Amplifier
- Build Your Own 3V Hearing Aid Circuit Diagram
- Studio Stereo Headphone Amplifier Circuit Diagram
- Stereo Headphone Amplifier: Build Your 90mR Circuit
- 427mW Class-A Headphone Amp
- Portable Headphone Amp: Circuit & 3.7V Upgrade
- 100mW Headphone Amplifier Schematic Build Guide
- LME49830 High Power Amplifier Circuit Diagram
- TDA7052 Speech Amplifier Circuit Diagram & Build Guide
- DC-Coupled Audio Amplifier Design: A Practical Guide
- Build a Low-Power IR Audio Amplifier Circuit Diagram
- 8 Watt Audio Amplifier Schematic: Build Your Powerful Project
- 7 Watt TDA2003 Audio Amplifier Circuit Design
- High-Power 60W Audio Amplifier Schematic Design
Build Your Own Spy Ear Sound Enhancer Circuit
Description
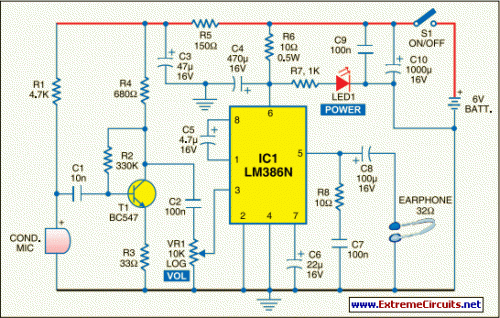
Similar to how binoculars enhance vision, this personal sound booster circuit improves auditory perception. This compact device generates an adjustable amplification of sounds captured through its built-in high-sensitivity condenser microphone. Consequently, users can perceive sounds previously missed. Powering the system with a 6V (4×1.5V) battery yields satisfactory results, as illustrated in Fig. 1. A diminutive signal amplifier is constructed around transistor BC547 (T1).
LM386N Audio Amplifier
The transistor T1 and associated components augment the captured sound signals from the condenser microphone (MIC). The boosted signal from the preamplifier stage is directed to input pin 3 of IC LM386N (IC1) via capacitor C2 (100nF) and volume control VR1 (10-kilo-ohm log). A stabilizing network comprising resistor R5 and capacitor C3 provides the preamplifier block with a stable supply voltage. Audio amplifier IC LM386N (IC1) is engineered for operation with power supplies ranging from 4 to 15V DC. This integrated circuit is widely used in portable audio devices due to its efficiency and performance.
Circuit diagram:
It’s contained within a standard 8-pin DIL package, exhibits minimal quiescent current consumption, and is well-suited for battery-operated portable applications. The processed output signal from capacitor C2 is fed into one end of volume control VR1. The wiper is connected to pin 3 of LM386N audio output amplifier. Note that the R6-C4 network is employed to RF-decouple the positive supply pin 6. R8-C7 forms an optional Zobel network that ensures high-frequency stability when connecting an inductive headphone load.
Capacitor C6 (22µF, 16V) connected between pin 7 and ground offers improved ripple rejection. The output of LM386N power amplifier can reliably drive a standard 32-ohm monophonic headphone/earphone. Assemble the circuit on a small general-purpose PCB and house it in a suitable metallic enclosure with an integrated battery holder and headphone/earphone socket. Incorporate the on/off switch (S1), volume control (VR1) and power indicator (LED1) onto the enclosure. Finally, mount the condenser microphone (MIC) on the front side of the enclosure and link it to the input of the preamplifier via a short length of shielded wire.
circuit from http://www.extremecircuits.net/2010/05/spy-ear.html
