- Long Delay Timer Circuit: 35 Minute Battery-Powered Design
- Build Your Custom 3-9 Minute Beep Timer Circuit
- Build Your Amplifier Timer Circuit – 15 Minute Delay
- Timed Beeper Circuit: Build Your Precise Timer!
- Build Your 30-Minute Bedside Lamp Timer Circuit
- Time Delay Circuit: Build Your Appliance Protector
- Midnight Security Light Circuit: A 1:00 AM Intrusion Defense
- Delay Relay Circuit: 12V, 15s
- Build a Powerful 1300W Space Heater Circuit Diagram
- Building a 1-Second Delayed Pulse with the 555 Timer
- 555 Timer Mono Stable Circuit Design & Build Guide
- Build Precise Time Delays with a 12-Stage Binary Counter
- Time Delay Circuit: 5A Output from Low Voltage Batteries
- Build a Powerful 1300W AC Heater Circuit Design
- Build Your 9-Second LED Timer & Relay Circuit 9V
Build Your Amplifier Timer Circuit – 15 Minute Delay
Description
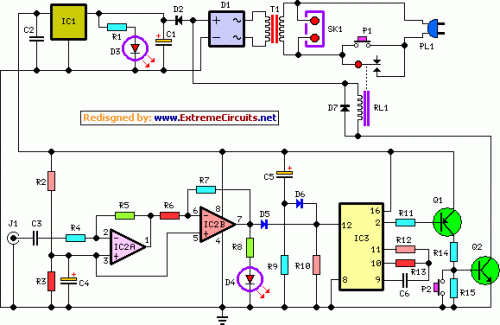
This circuit disables an amplifier or any other device when a low-level audio signal applied to its input is absent for at least 15 minutes. Activating P1 engages the device, supplying power to any appliance connected to SK1. The input audio signal is amplified and squared using IC2A and IC2B, and monitored by LED D4. When D4 illuminates, albeit briefly, IC3 is reset and restarts its counting process.
Pin 2 of IC3 remains in the low state, permitting the two transistors to conduct, and the relay operates. After a 15-minute interval, if no signal appears at the input, IC3 concludes its counting, and pin 2 transitions to a high state. Q1 and Q2 cease conducting, and the relay disengages. Consequently, the device is completely off, along with any appliances connected to SK1. C5 and R9 reset IC3 upon power-on. P2 permits switch-off at any moment.
IC3 – 4060 14 Stage Ripple Counter and Oscillator IC
The 4060 is a versatile integrated circuit commonly used as a ripple counter and oscillator. In this circuit, it’s employed to accurately measure time intervals, specifically for the 15-minute delay function. The IC's internal circuitry generates a stable clock signal that is counted by its stages, providing a precise timing mechanism. It typically operates on external clock pulses, which are generated by its own internal circuitry, and is a foundational component for many timing applications.
IC2 – LM358 Low Power Dual Op-amp
The LM358 is a low-power dual operational amplifier IC. In this design, it serves as a high-gain amplifier to boost the input audio signal before it's squared. Its dual nature allows it to perform amplification on both input channels, ensuring consistent performance regardless of the signal source. The LM358 is known for its low power consumption and is commonly used in portable and battery-powered applications.
Circuit diagram:
Parts:
- R1,R8___________1K 1/4W Resistors
- R2,R3___________4K7 1/4W Resistors
- R4_____________22K 1/4W Resistor
- R5______________4M7 1/4W Resistor
- R6,R9__________10K 1/4W Resistors
- R7______________1M5 1/4W Resistor
- R10___________100K 1/4W Resistor
- R11____________15K 1/4W Resistor
- R12____________10M 1/4W Resistor
- R13_____________1M 1/4W Resistor
- R14_____________8K2 1/4W Resistor
- R15_____________1K8 1/4W Resistor
- C1____________470µF 25V Electrolytic Capacitor
- C2,C3,C6______100nF 63V Polyester Capacitors
- C4,C5__________10µF 25V Electrolytic Capacitors
- D1_____Diode bridge 100V 1A
- D2,D7________1N4002 100V 1A Diodes
- D3__________Red LED 5mm.
- D4_______Yellow LED 5mm.
- D5,D6________1N4148 75V 150mA Diodes
- IC1___________78L12 12V 100mA Voltage regulator IC
- IC2___________LM358 Low Power Dual Op-amp
- IC3____________4060 14 stage ripple counter and oscillator IC
- Q1____________BC557 45V 100mA PNP Transistor
- Q2____________BC337 45V 800mA NPN Transistor
- J1______________RCA audio input socket
- P1_____________SPST Mains suited Pushbutton
- P2_____________SPST Pushbutton
- T1_____________220V Primary, 12V Secondary 3VA Mains transformer
- RL1___________10.5V 270 Ohm Relay with SPST 5A 220V switch
- PL1____________Male Mains plug
- SK1__________Female Mains socket
Notes:
- Simply connect left or right channel tape output of your amplifier to J1.
- You can employ two RCA input sockets wired in parallel to allow pick-up audio signals from both stereo channels.
- The delay time can be varied changing R13 and/or C6 values.
- Needing to operate a device not supplied by power mains, use a double pole relay switch, connecting the second pole switch in series to the device supply.
